Mastering Moulds
•Posted on July 08 2019
Silicone moulds can be really helpful in providing a quick way to achieve a complex shape in your decorating. My first silicone mould was a pair of baby feet and I’ve used it so many times for cute baby shower themed cupcake toppers. As soon as I realised I could quickly and easily pop out identical decorations – I was hooked on moulds.
However over time I've realised some moulds are easier to use than others, and in some cases there are specific techniques that you need to successfully make fondant decorations with silicone moulds.
Here’s some tips to getting silicone moulds to work for you:
Simple vs. Detailed Moulds
Some moulds are easier to use than others. Generally, if the mould that you’re using has a large surface area on the back without many folds or crevasses, it should pop out fairly easily. These are the kind of designs you should be practicing on to get started.
In the case of simple moulds, you can simply push your fondant in, pop it out and place it on some baking paper to set.
Complex moulds have lots of details, nooks/crannies or are entirely encased. These take more experience and practice and may even require the decoration to be set in the mould prior to popping out.
Our unicorn moulds below are a good example of a simple and detailed mould for a similar design. The simpler unicorn mould has no embossed details, whereas the more detailed unicorn mould has a lot of folds internally that can make releasing the fondant difficult, if it's not handled correctly.

Getting started
When you're learning to work with fondant, be it making decorations in moulds or covering cakes, I recommend starting with white fondant. Without the food colour you’re less likely to suffer from sticky fondant. Plus, you can always come along later and paint your decoration.
White fondant also won’t show a cornflour reside, so there’s no great need to dust it off/wash it down afterwards.
If you do opt for coloured fondant, and you find cornflour is giving you a speckled white finish to your decoration, you can brush it down afterwards with some rose spirit to absorb the excess flour. Or, you can give it a quick spray with super shiny spray after you've painted your decoration.
Weather conditions
As always, fondant or sugar paste is impacted by the weather. This week it is quite humid and rainy outside, so there is a lot of moisture in the air. We will have to be conscious of this when making our fondant decorations by allowing more time for setting and anticipating that our fondant will be stretchy and stickier than normal.
To assist in drying your pieces, you can use a hardening agent (in this case we used our Gum Arabic, because it comes in convenient 4g bottles which is more than you'd need for making fondant decorations). Just a pinch in to a handful of fondant will go a long way in assisting your sugar pieces dry in the rainy weather conditions.
Season your moulds
The first decoration you make with a new mould is kind of like the first pancake in the frying pan. It never works out perfectly.
New moulds (or freshly washed moulds) can have a smooth/slick surface to them that makes your fondant stick. When I’ve got a new mould, I’ll often season it by loading it up with cornflour and then pressing a piece of fondant in to all the nooks and crannies. I do this a few times, scrunching fondant in to the mould before dusting it again. After a while, your fondant will be less likely to stick in the mould.

Before and the aftermath - how I season a mould with cornflour
What you’ll find is that the first few times you use the mould, no matter how much cornflour you use, there will be areas in the mould that stick. This only starts to alleviate after you’ve dusted and re-used your mould a few times.
For this reason, I’ll often avoid over-washing my moulds. If they are still clean but with a thin dusting of cornflour, I’ll just box them away for next time. If you do wash each time, ensure they are fully dry and seasoned once again before the next use.
And just on this, even a seasoned mould will still need reapplication of cornflour every so often when using multiple times. Any time it starts to stick, get dusting.
Fill your moulds
I tend to start with a larger piece of fondant, and press it in to all the details of the mould before cutting away the bulge that is left at the back.

Once the bulk of the fondant is gone and you just have enough to fill the mould, you can get to work on tidying the edges. I use the tip of my finger against the edges to rub away any fuzzy bits of fondant.

If there is a spot that is missing fondant, just push a small piece in to the gap and rub it in to the fondant already in the mould. It should meld together fairly easily.
Releasing decorations
If in the first few tries your decoration gets stuck in places, don't despair. That is totally normal! The more seasoned your mould the easier it is. After a few tries, and with a good dusting of cornflour, you should find that the decoration is coming away from the edges more easily.
Bend the mould to make sure the fondant is coming away from the edges. Start slowly and identify any places on the edges that are sticking. Use a pin or the tip of your art knife to release the stuck areas you can see. When you can see the edges are not attached to your decoration, you're ready to start to release the fondant.
I start with the most difficult or delicate parts of the mould and gently pry those out first before moving on to the larger, sturdier parts. For the unicorn, the trickiest part was the legs.
Once those are free, you can continue to bend and separate the decoration from the mould, gently prising it away where necessary.

If you really are having trouble, try leaving the decoration in the mould until it starts to firm up (30-60 minutes) before attempting to release. Some people use the freezer to speed this up, but you'll need to be careful of condensation damage afterwards if you go down this path.
Tidy it up
Sometimes, stubborn sections might just not want to come out neatly. As long as the majority of the decoration comes out correctly, you can usually fix up any small flaws with modelling tools or an art knife. In my case with the unicorn mould, the back legs were being difficult. Rather than giving up on my decoration all together, I simply cut away and shaped the back legs until they looked acceptable. It wasn't perfect, but it also didn't affect the overall visual of the decoration.
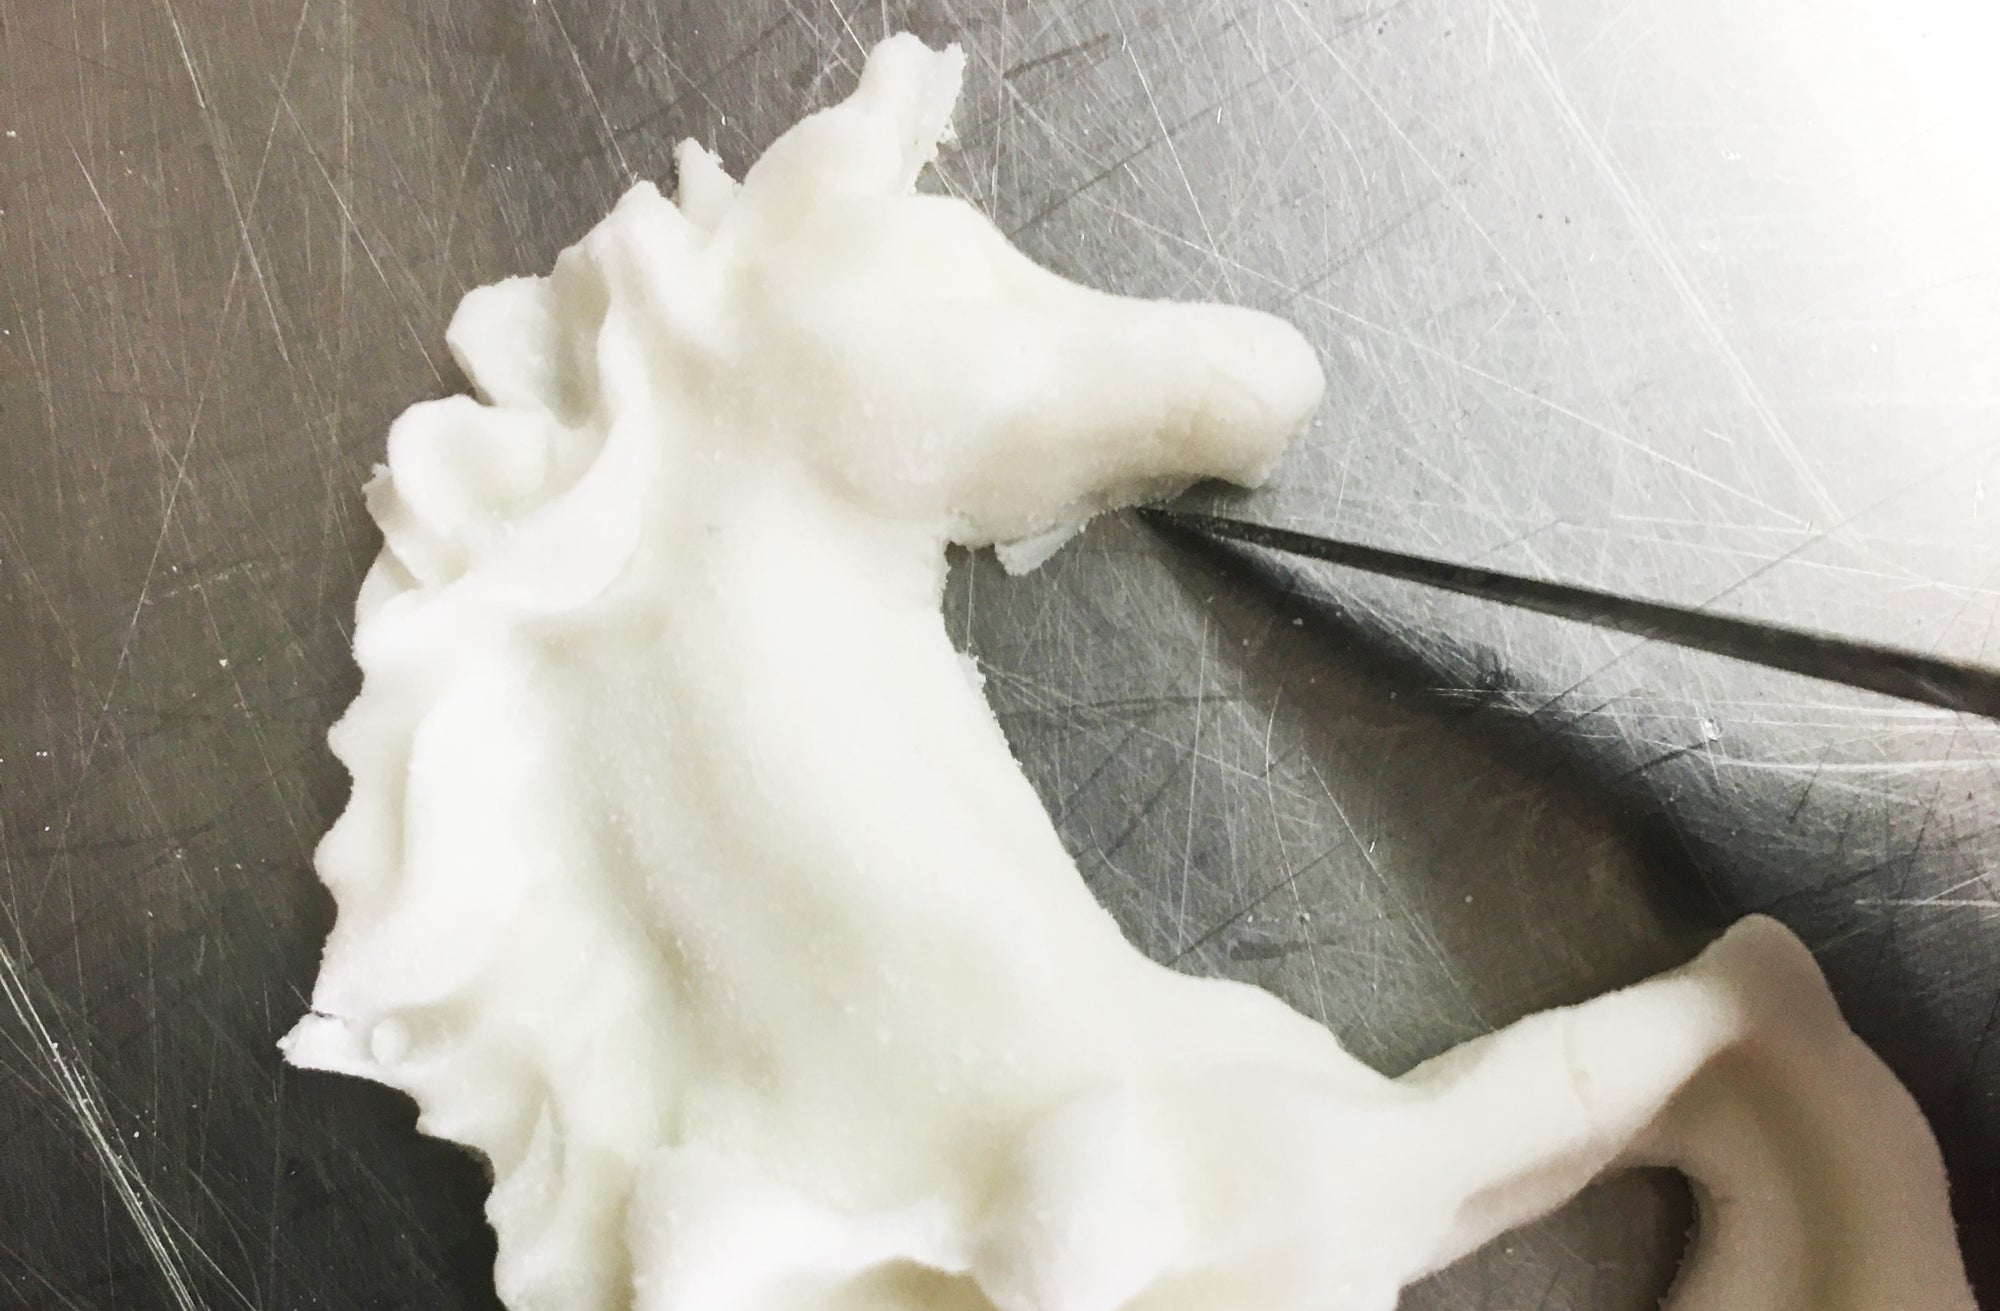
Thin or fuzzy lines around the outside of your decoration can also be cut away with an art knife.
 Cut away fuzzy parts with your art knife, and tidy up any difficult areas with modelling tools.
 Cut away fuzzy parts with your art knife, and tidy up any difficult areas with modelling tools.

Tada! - the finished detailed and simple unicorn decorations using our moulds and white fondant.
From there, you can simply finish your fondant decoration however you please! We quickly ran some liquid food colour mixed with rose spirit over ours to give you an indication of what's possible.

Other uses for moulds
Don’t just stop at fondant! Ice blocks, chocolates, candles and crayons are just some of the creative ways that our customers have used our silicone moulds.
I hope this encourages you to get experimenting with moulds! Once you've figured out how to use them, they'll become an important part of your cake decorating tool kit.
Happy caking!
~Sarah-Jane

Comments
0 Comments
Leave a Comment